How to install Wan2GP with AMD Radeon 7600 XT (16GB) on Linux (Ubuntu 22.04) for local AI video generation
So, I was curious about Wan2GP (I heard about WAN2.2) and found that all the install instructions are for those with NVidia graphic card (Linux & Windows) or AMD graphic card (Windows only).
WanGP by DeepBeepMeep can be downloaded from https://github.com/deepbeepmeep/Wan2GP. According to the git intro, it is "The best Open Source Video Generative Models Accessible to the GPU Poor". I guess my card (AMD Radeon 7600 XT 16GB) can be considered as "GPU poor" since it's not an NVidia high-end card. I'm one of those holdouts who's unlikely to purchase NVidia RTX 5090 simply because I'm only tinkering and also have some concerns about the faulty design of the 5090's 12VHPWR connector that can be a serious fire hazard. Although there are AMD Radeon Pro W7900 (48GB) - CAD $5700 and AMD Radeon Pro W7900 (32GB) - CAD $3500, I find them to be way too expensive. My CAD $500 AMD Radeon RX 7600 XT (16GB) card is sufficient for now and can run Ollama as well as ComfyUI.
IMPORTANT: Before you run the application, make sure you don't skip step #2.
Here are the steps:
1) Install ROCM for Linux from https://rocm.docs.amd.com/projects/install-on-linux/en/latest/install/quick-start.html and choose the appropriate install method for your distro. Mine's Ubuntu 22.04 and here's the install instruction: https://rocm.docs.amd.com/projects/install-on-linux/en/docs-6.1.2/how-to/native-install/ubuntu.html
2) DON'T SKIP this step so you don't need to run wan2gp as a privileged user (root). Make sure you that you've added yourself to UNIX user group: render (and optionally video) if you haven't done so.
To test it, run the command "rocminfo" as a regular user (don't use the root user).
user@localmachine:~$ rocminfo
ROCk module version 6.12.12 is loaded
Unable to open /dev/kfd read-write: Permission denied
coder is not member of "render" group, the default DRM access group. Users must be a member of the "render" group or another DRM access group in order for ROCm applications to run successfully.
If you get permission denied as above, it means that you need to issue the following command (replace "user" with either your own username or a different username that you'll use for the Wan2GP application:
user@localmachine:~$ sudo usermod -a -G render user
user@localmachine:~$ sudo usermod -a -G video user
If you're successful, there should be no output. Then you'll have to logout, and login again so that the change in user group modification is reflected, and test again. If everything is correct, you should get the following output:
user@localmachine:~$ rocminfo
ROCk module version 6.12.12 is loaded
=====================
HSA System Attributes
=====================
Runtime Version:         1.15
Runtime Ext Version:     1.7
System Timestamp Freq.:  1000.000000MHz
Sig. Max Wait Duration:  18446744073709551615 (0xFFFFFFFFFFFFFFFF) (timestamp count)
Machine Model:           LARGE
System Endianness:       LITTLE
Mwaitx:                  DISABLED
XNACK enabled:           NO
DMAbuf Support:          YES
VMM Support:             YES
...
...
3) First, change directory to /opt, then create a new folder called "wan2gp", then change the ownership to user:user. Install Wan2GP with git.
user@localmachine:~$ cd /opt
user@localmachine:/opt$ sudo mkdir wan2gp
[sudo] password for user:
user@localmachine:/opt$ sudo chown user:user wan2gp
user@localmachine:/opt/wan2gp$ git clone https://github.com/deepbeepmeep/Wan2GP.git
4) Now you have the Git repo cloned, do the following initalization (don't follow the manual installation step using conda on DeepBeepMeep website, we don't need conda).
user@localmachine:/opt/wan2gp$ python3 -m venv wan2gp-env
user@localmachine:/opt/wan2gp$ source wan2gp-env/bin/activate
5) Then install Pytorch (torch, torchvision, and torchaudio). This should take several minutes downloading over 1.5Gb of files. On Wan2GP original instruction, it actually forces torch to be version 2.7.0.0. This doesn't need to be the case for AMD.
user@localmachine:/opt/wan2gp$ pip install torch torchvision torchaudio --index-url https://download.pytorch.org/whl/rocm6.4
6) Install Wan2GP dependencies
user@localmachine:/opt/wan2gp$ cd /opt/wan2gp/Wan2GP
user@localmachine:/opt/wan2gp/Wan2GP$ pip install -r requirements.txt
user@localmachine:/opt/wan2gp/Wan2GP$ pip install sageattention
7) Now you can start the application. I made a simple batch script for the startup (note: I have no experience with Python development environment, so I don't know why I have to type source ..../bin/activate) so I just made a simple batch script to make it less repetitive:
#!/bin/bash
source wan2gp-env/bin/activate
cd Wan2GP
python wgp.py
##### Use python wgp.py --share if you want to create a Gradio Live URL (tunnel to your local machine)
Wait until it saying Running on local URL.... and then point your web browser to localhost port 7860.
Please note that before you can do any text to video generation, it will need to download the models and this could take anywhere between 15 minutes to an hour depending on how fast your internet connection is. Look at the output and notice any error messages. Once the models have been loaded, you can generate your video. Also, I'd recommend that you click the Configuration tab and tinker with the settings before trying to generate the video.
Here's the output log:
user@localmachine:/opt/wan2gp$ source wan2gp-env/bin/activate
(wan2gp-env) user@localmachine:/opt/wan2gp$ ls
Wan2GP wan2gp-env
(wan2gp-env) user@localmachine:/opt/wan2gp$ cd Wan2GP/
(wan2gp-env) user@localmachine:/opt/wan2gp/Wan2GP$ ls
ckpts defaults finetunes loras_flux loras_i2v models preprocessing requirements.txt wgp_config.json
configs docs LICENSE.txt loras_hunyuan loras_ltxv outputs __pycache__ settings wgp.py
'Custom Resolutions Instructions.txt' favicon.png loras loras_hunyuan_i2v loras_qwen postprocessing README.md shared
(wan2gp-env) user@localmachine:/opt/wan2gp/Wan2GP$ python wgp.py
/opt/wan2gp/wan2gp-env/lib/python3.10/site-packages/numba/np/ufunc/parallel.py:371: NumbaWarning: The TBB threading layer requires TBB version 2021 update 6 or later i.e., TBB_INTERFACE_VERSION >= 12060. Found TBB_INTERFACE_VERSION = 12050. The TBB threading layer is disabled.
warnings.warn(problem)
Warning: Could not initialize NVML. GPU stats will not be available.
* Running on local URL: http://localhost:7860
To create a public link, set `share=True` in `launch()`.
Loading Model 'ckpts/wan2.2_text2video_5B_quanto_mbf16_int8.safetensors' ...
************ Memory Management for the GPU Poor (mmgp 3.5.10) by DeepBeepMeep ************
Pinning data of 'transformer' to reserved RAM
The whole model was pinned to reserved RAM: 21 large blocks spread across 4861.01 MB
Hooked to model 'transformer' (WanModel)
Pytorch compilation of 'transformer' is scheduled for these modules : ['blocks.*'].
Async loading plan for model 'transformer' : base size of 4.54 MB will be preloaded with a 156.23 MB async circular shuttle
Pinning data of 'text_encoder' to reserved RAM
The whole model was pinned to reserved RAM: 21 large blocks spread across 6445.29 MB
Hooked to model 'text_encoder' (T5Encoder)
Async loading plan for model 'text_encoder' : base size of 2003.01 MB will be preloaded with a 184.10 MB async circular shuttle
Pinning data of 'vae' to reserved RAM
The whole model was pinned to reserved RAM: 6 large blocks spread across 1344.09 MB
Hooked to model 'vae' (WanVAE_)
Lora 'loras/Wan2_2_5B_FastWanFullAttn_lora_rank_128_bf16.safetensors' was loaded in model 'models.wan.modules.model'
Lora 'loras/Wan2_2_5B_FastWanFullAttn_lora_rank_128_bf16.safetensors' was loaded in model 'models.wan.modules.model'
'loras/Wan2_2_5B_FastWanFullAttn_lora_rank_128_bf16.safetensors' was pinned entirely to reserved RAM: 3 large blocks spread across 630.13 MB
100%|████████████████████████████████████████████████████████████████████████████████████████████████████████████████████████████████████████| 4/4 [01:03<00:00, 15.78s/it]
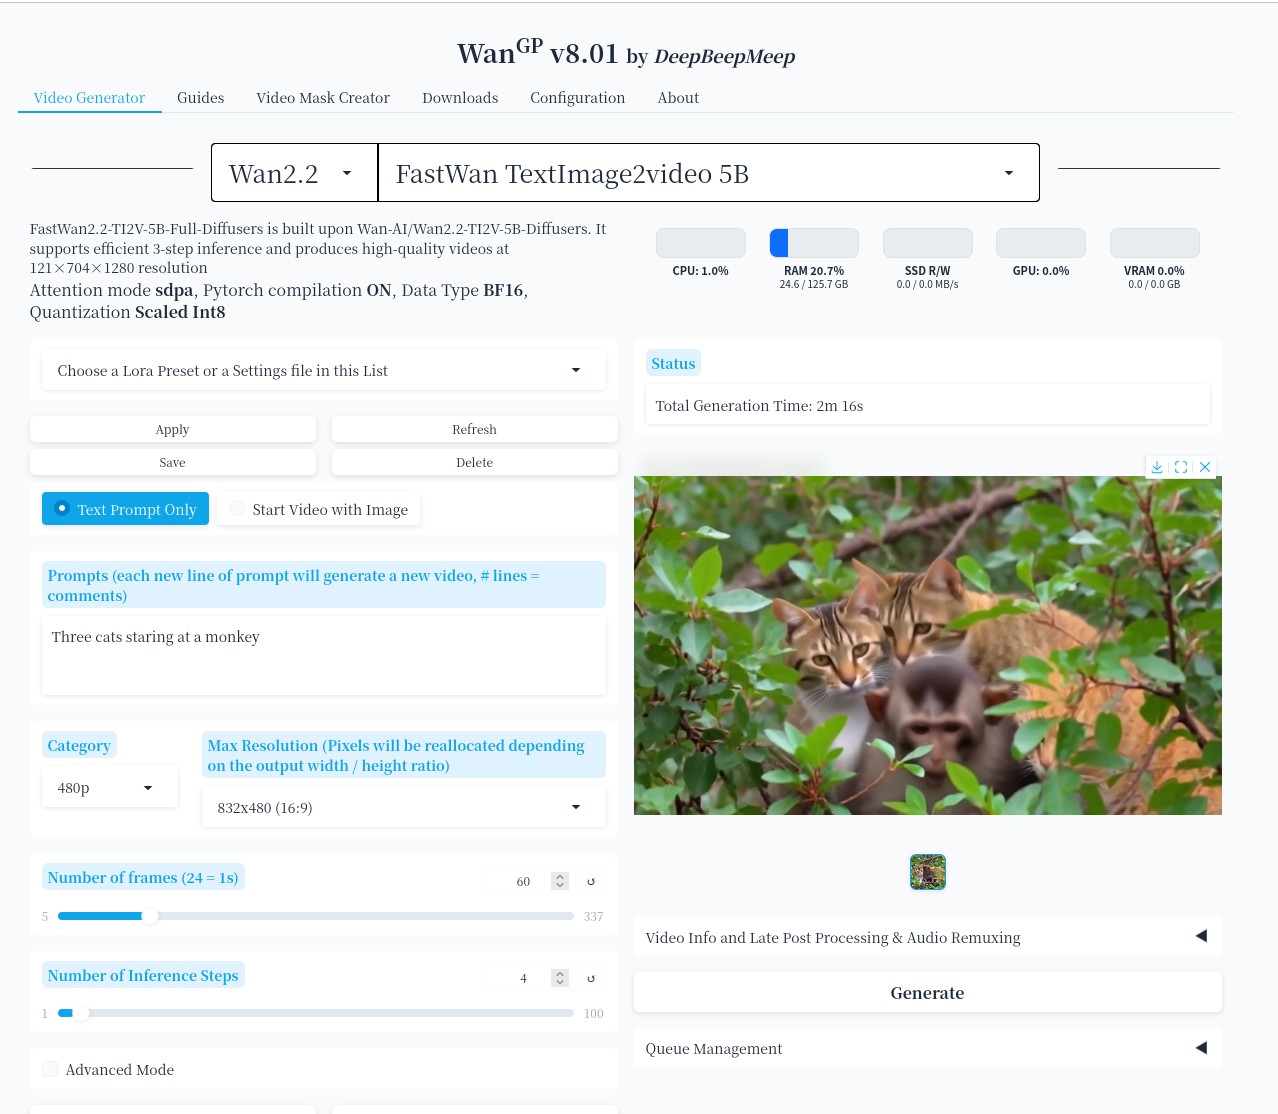
New video saved to Path: outputs/2025-08-22-15h53m23s_seed40851891_Three cats staring at a monkey.mp4
I hope you find this blog post helpful.